iPhone Disability Error Step by Step Guide
Table of Contents
If your iPhone says ‘iPhone is disabled. Try again in 1 minute’ or, worse, the message: ‘iPhone is disabled. Connect to iTunes’ or an image indicating you need to connect to a computer, help is at hand. Here’s how to fix disabled iPhone error messages and get your phone working again.
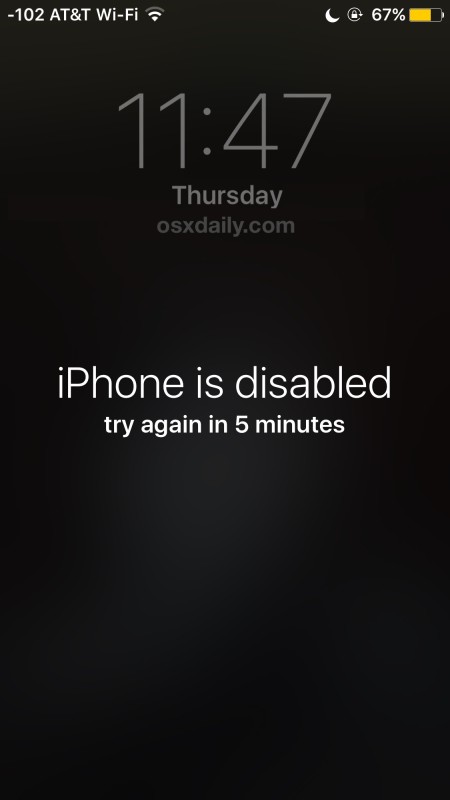
Have you ever picked up your iPhone to discover the message “iPhone is disabled” and to “try again in 1 minute” or to try again 5, 15, 60 minutes? In the worst scenarios, the message says “iPhone is disabled. Connect to iTunes”, and the device is unusable until then. So, what is going on here, why is the iPhone disabled? And how do you fix it so that you can use the iPhone again? The answers to these questions are usually straight forward, let’s review the causes of this message, and more importantly, the solutions to this so that you can unlock and re-enable the iPhone again for full use.
iPhone is Disabled error messages
Here’s a common – but worrying – notification that you may have seen on your iPhone:

iPhone is disabled. Try again in 1 minute
That’s not too bad. But it might be worse:
iPhone is disabled. Try again in 60 minutes
Annoying! It could also be 5 or 15 minutes. The warnings that include a waiting period are less worrying but can ramp up to the worst error message of all if you’re not careful:
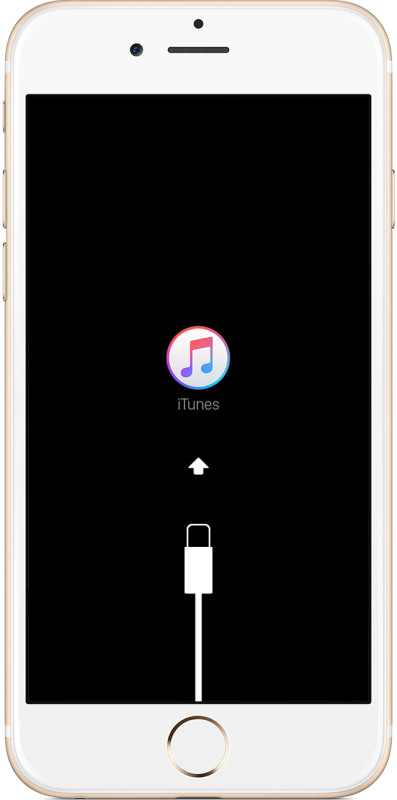
iPhone is disabled. Connect to iTunes
If you have seen the above message, or the ominous screen below on your iPhone or iPad, you have a bigger problem. But we’re here to help you fix it!

These error messages range from mildly inconvenient to totally incapacitating, but whichever one you get you absolutely shouldn’t ignore them.
Why is My iPhone Disabled?
A locked iPhone requires a passcode or Touch ID to enter and access the device as a security precaution. After the iPhone passcode has been incorrectly entered five times in a row, the iPhone will automatically disable itself for 1 minute, giving the “iPhone is disabled” error message on screen. The obvious solution in this case is to wait for the minute (or several) to pass and then enter the correct passcode to unlock the iPhone and get around the disabled message. In the future, just enter the proper passcode in the first place and you’ll avoid this message and the lock out period.
You may find it interesting to know how many incorrect passcode entries are required to disable the iPhone for a particular amount of time and to get the accompanying message, that information is as follows:
- 5 incorrect passcode entries in a row – iPhone is disabled, try again in 1 minute
- 7 incorrect entries in a row – iPhone is disabled, try again in 5 minutes
- 8 incorrect entries in a row – iPhone is disabled, try again in 15 minutes
- 9 incorrect entries in a row – iPhone is disabled, try again in 60 minutes
- 10 incorrect passcode entries – iPhone is disabled, connect to iTunes (or the iPhone wipes itself of all data if self-destruct mode is turned on)
Waiting a minute isn’t too bad, but waiting many minutes to an hour is inconvenient, as is connecting to iTunes to enable the iPhone again. Let’s further understand this issue to avoid it in the future, and going further we’ll show you how to get around the disabled message.
How can I stop my phone being disabled?
The way to avoid seeing these messages in future is to either be more careful about inputting your passcode, choose a complex passcode with more characters (because this is less likely to be entered accidentally), or stop using a passcode at all (for security reasons we very much advise against this last option).
Allow us to note in passing, however, that there is a related and more drastic security measure that is optional: one that will wipe the device completely if someone gets the passcode wrong 10 times in a row. This is useful if your iPhone contains data you cannot allow to fall into the wrong hands.
Go into Settings, then Touch ID & Passcode (or Face ID & Passcode), then enter your passcode. If you scroll down to the bottom you’ll see a toggle labelled ‘Erase Data’. Don’t use this option lightly; it could prove highly inconvenient if you’re forgetful.
How to fix a disabled iPhone
If you see the ‘Connect to iTunes’ message – or in iOS 14 the ‘Connect to a Mac/PC’ image – things are bad: you are locked out of the iPhone or iPad and the only way to get back in is to wipe it. This means you will lose all the data on the phone as part of the necessary recovery process. You’ll be able to restore the data from your last backup, if that’s any consolation. You did back up, right?
Fixing “iPhone is Disabled. Connect to iTunes”
This is the worst scenario for an iPhone being disabled because it requires you to connect the iPhone to a computer to gain access to it again. Hopefully you made a backup recently to that computer, and hopefully you remember the actual passcode for the iPhone, otherwise you’ll have to erase the device and lose all data on it. Yes really. Yet another reason frequent device backups are important.

If you know the iPhone passcode and have backed it up recently, you can simply unlock the device with iTunes though it requires a restore:
- Connect the iPhone to a computer it has synced to before with a USB cable and launch iTunes
- Choose “Sync” in iTunes and enter the proper passcode when requested to unlock the device, this backs up the iPhone to the computer
- Choose “Restore” to restore the iPhone from the most recent backup
If you don’t know the iPhone passcode, you have to wipe the iPhone clean and it will erase all data using recovery mode. The instructions on resetting a forgotten iPhone passcode are here. If you made a backup to iTunes or iCloud, you can restore it after the fact to that backup.

If you do not know the iPhone passcode and you do not have a backup, the data on the iPhone will be erased and lost forever. There is no way around that, not even Apple can unlock an iPhone and access the data in such a situation. Thus, the lesson is don’t forget a device passcode, and always keep regular backups!
What you need to fix your iPhone disability?
A computer: Before you start you need to locate a computer (Mac or PC). If you don’t have access to a computer you may need to visit an Apple Retail Store or any Mac reseller to use one of their Macs.
A lightning to USB cable: You will also need a Lightning to USB cable. This could be a problem if your Mac only has USB-C and your iPhone cable uses the older USB-A… In that case you’ll need an adaptor or a USB-C to lightning cable such as this one. If you own an iPhone 11 it will have shipped with a USB-C to lightning cable, which could be an issue if your Mac doesn’t have USB-C…
Step 1: Enter Recovery Mode
The first step is to connect your iPhone to your computer and enter recovery mode. The method used will depends on the model of iPhone you have.
iPhone 8, 8, Plus, X or newer
- Press and hold the Side button and one of the volume buttons and wait for the power off slider to appear.
- Drag the slide to turn off your iPhone.
- Hold the side button on your iPhone as you plug your iPhone into the Mac using your cable. Keep holding the side button until the recovery screen appears.
iPad (Face ID)
- If your iPad has Face ID you need to press and hold the Top button and either volume button until the power off slider appears.
- Turn off your iPad.
- Now connect your iPad to your Mac while pressing the Top button.
- Keep pressing this button until you see the recovery mode screen.
iPad with Home button
- This time you can press and hold the Top button until the power off slider appears.
- Turn off the iPad by dragging the slider across.
- Now connect your iPad to your Mac while pressing the Home button.
- Keep pressing Home until you see the recovery screen.
Step 2: Locate your iPhone/iPad via your Mac/PC
Depending on the software running on your Mac or PC the next step will either involve the Finder on a Mac or iTunes on Windows (or on a Mac running an older version of macOS).
macOS Catalina
- If you are running Catalina open a Finder window
- You will see your iPhone or iPad on the left side of the finder window under locations
- Click on it
macOS Mojave or older
If you are running Mojave or older on your Mac you will need to open iTunes.
There are multiple versions of iTunes you could be running and the method is different for each:
iTunes 12
Click on the iPhone’s icon in the upper-left corner of the iTunes window.
iTunes 11
Click on the iPhone tab on the right side of the window.
iTunes 10
The iPhone will be in the sidebar on the left
On a PC running iTunes for Windows
The process will match one of the versions of iTunes listed above (depending on the version you are running).
Step 3: Choose the option to Restore
Now that you have selected your iPhone or iPad on the computer you need to click on Restore.
Once you do this the necessary software will download. This can take a few minutes. If it takes longer than 15 minutes you might need to reconnect your device following the steps above.
Once the download has finished you will see onscreen prompts to follow. First you will have to wait while the data on your device is erased.
Step 4: Set up your iPhone
You can now set up your iPhone as if it was new.
You’ll get the option while following these steps to Restore from backup – which we hope you have.
My iPhone is disabled and won’t connect to iTunes!
Fixing the disabled iPhone isn’t always as simple as outlined above. Some iPhone owners find that connecting the disabled iPhone to iTunes doesn’t do much of anything.
If you’ve tried both the standard iTunes wipe and Recovery Mode, you may be able to wipe it using iCloud, which we explain in the next section.
Restore your iPhone with iCloud
An alternative method of wiping the disabled iPhone and starting again is to use iCloud – this is only possible, however, if you’ve set up Find My iPhone, and if the disabled iPhone has a data connection.

On your Mac (or another iPhone or iPad), go to icloud and click on Find iPhone. You’ll have to enter the password for your Apple account.
After a brief wait, a map will appear showing the location of your devices. Click All Devices at the top, then select the iPhone you want to erase. Click Erase iPhone.
How do I avoid iPhone being disabled from incorrect passcode entry in the future?
To prevent this from happening in the future you have a few options. The easiest is to simply not enter the wrong passcode repeatedly, which will prevent the iPhone from locking up and disabling itself. Duh, right? Since that’s not always an option, another choice is to enable complex passcodes, since they require a longer character string be entered before the password is rejected. Keeping the iPhone in a different pocket, or out of reach of someone who is intentionally or accidentally entering passcodes is also a good idea. And finally, as we’ve already mentioned several times, always make regular backups of the device, just in case you do have to restore it to regain access.
Thank you for reading this article on How to Fix iPhone Disable Error step by step using iTunes. If you have any doubt, please comment below and let us know. We at India Techno Blog are here to solve all your Tech related queries.
Do not forget to read our article on iPhone related issues.
https://indiatechnoblog.com/transfer-music-from-android-to-iphone-without-computer/
https://indiatechnoblog.com/how-to-schedule-a-text-message-on-iphone-in-2020/

